

A dormer roof leak almost always starts at a junction, not a flat surface: step flashing along the cheek walls, the headwall where the dormer front meets the main roof, the valley beside it, or the seal around the window itself. Water finds the seam and follows gravity into your attic or wall cavity long before it shows up as a stain on your ceiling.
If you've spotted a wet spot, discoloration on drywall near a dormer, or a musty smell in an upstairs closet, here's what to do right now, before you read another word of this guide:
- Stay off the roof if it's wet, icy, or you don't have fall protection. A leak can wait an hour. A fall cannot.
- Contain the water. Set a bucket under active drips and move furniture, boxes, or electronics out of the drip zone.
- Mark and photograph the stain immediately, then check the attic above it for the highest point of visible moisture. Date the photo. Insurance adjusters and roofers both need this reference point.
Most dormer leaks trace back to failed or aging flashing rather than a hole in the shingles themselves, which means many are diagnosable and fixable without a full roof replacement. Georgia's mix of heavy spring rain, summer thunderstorms, and wind-driven weather off the Atlanta metro corridor puts extra stress on these junctions, so a leak you catch early is usually a repair, not a rebuild.
Key Takeaways
Most dormer roof leaks originate at a flashing junction, and tracing the leak to its highest wet point before any repair work begins prevents wasted money on the wrong fix.
| Point | Details |
|---|---|
| Check junctions first | Inspect step flashing, headwall flashing, valleys, and window seals before assuming a shingle problem. |
| Trace uphill in the attic | The ceiling stain shows where water dripped, not necessarily where it entered. |
| Run a hose test carefully | Wet one section for 5 to 10 minutes and wait, working section by section with a partner inside. |
| Match cost to the fix | Isolated repairs typically run $200 to $2,000; hidden rot adds significantly more. |
| Watch for the red flags | Soft sheathing, mold, or a leak that returns after repair means call a professional immediately. |
| Call a repair-first roofer | The Original Roof Repair Company diagnoses the exact entry point and recommends replacement only above the $4,000 repair threshold. |
Table of Contents
- Where Dormer Roof Leaks Actually Start
- How Do You Find Where a Dormer Leak Is Coming From?
- Which Repair Fixes the Leak You Found?
- What Do Dormer Repairs Cost and How Long Do They Take?
- Should You Repair the Dormer or Rebuild It?
- A Seasonal Checklist to Keep Dormer Leaks From Starting
- How a Repair-First Roofer Diagnoses a Dormer Leak
- Why the "Just Reseal It" Advice Keeps Failing Homeowners
- Get a Dormer Leak Diagnosed the Right Way
- Sources
- FAQ
Where Dormer Roof Leaks Actually Start
Dormers are roofs built on top of roofs, and every place two roof planes or materials meet is a potential entry point. Understanding which junctions fail most often tells you where to look first instead of guessing.
Here are the failure points that account for the overwhelming majority of dormer leaks:
- Step flashing along the cheek walls. Each course of shingles running up the side of a dormer needs its own individual piece of step flashing to correctly overlap and shed water. When even one piece is missing, rusted through, or was never cut long enough, water slips behind the siding.
- Headwall (apron) flashing at the front. This is the flashing where the dormer's front wall meets the main roof slope. It takes the brunt of rain running downhill and is a frequent cause of dormer window leaks when the metal has separated from the wall or the caulk bead has failed.
- Valley flashing beside the dormer. Valleys concentrate runoff from two roof planes into one channel, so a small gap or a torn membrane here moves a surprising volume of water fast.
- The back-pan or cricket behind the dormer. On wider dormers, a small triangular cricket diverts water around the back wall. Without one, water pools and eventually finds a seam.
- Window frame seals. Caulk and flashing tape around the dormer window degrade with UV exposure and thermal cycling, often years before anyone notices.
- Pipe boots and roof vents near the dormer. Rubber boots crack and shrink over time, opening a gap around the pipe collar.
- Popped nails and cracked or missing shingles on the dormer's own small roof deck, which is easy to overlook because it's a fraction of the total roof area.
Water rarely drips straight down from where it enters. It travels along a rafter, a sheathing seam, or a truss chord before gravity finally wins, so the stain on your ceiling is a clue about the leak's path, not necessarily its source.
That's why the ceiling stain in the corner of an upstairs bedroom might trace back to a headwall flashing joint three or four feet away. Water follows the framing, not a straight line, and it can travel along the top of the insulation for a surprising distance before it soaks through drywall.
Pro Tip: Wind-driven rain changes the pattern. In a storm with sustained gusts, water gets pushed sideways and even slightly upward under flashing laps that would hold fine in calm rain. If your leak only shows up during specific storms with a particular wind direction, tell your roofer that detail. It narrows the search dramatically.
How Do You Find Where a Dormer Leak Is Coming From?
Tracing a dormer leak is a process of elimination, and the sequence matters. Skipping straight to the roof without checking the attic first usually wastes a repair estimate on the wrong spot.
- Start inside, in the attic. Bring a flashlight and go up during daylight if possible. Locate the ceiling stain from below, then go to that same spot in the attic and look uphill and outward from it.
- Find the highest wet point, not just the visible stain. Check for dark or rusted nail tips poking through the sheathing, water lines staining the wood, or damp insulation. The highest point of moisture is almost always closer to the real entry point than the stain below.
- Inspect the dormer's flashing runs from the top side, if you can safely see them from a ladder or from an adjacent roof section without stepping onto wet or steep material. Prioritize the step flashing seams, the headwall, and the valley or cricket behind the dormer.
- Rule things out with a controlled water test. Have one person on a ladder or safely positioned with a garden hose, and one person inside the attic with a flashlight and a phone. Wet one specific section for 5 to 10 minutes, starting low and working upward, and wait between sections. Stop the moment your partner spots new moisture and mark that exact spot with tape or a grease pencil.
- Work section by section, never testing the whole dormer at once. Testing everything simultaneously tells you a leak exists somewhere, which you already knew. Testing one joint at a time tells you which joint is guilty.
- Photograph every wet mark, stain, and test result with a timestamp. This documentation matters later, whether you're calling a roofer for an estimate or filing an insurance claim.
Never attempt the topside inspection or hose test on a steep dormer roof, a wet roof, or in high wind. If your dormer roof pitch is steep, if you don't have proper fall protection, or if getting a clear view from a ladder isn't possible, stop and call a licensed roofer. Diagnosing a leak isn't worth a fall.
Pro Tip: A short, repeatable hose test beats guesswork every time. Roofers who skip this step and just "reseal everything" are often masking the real problem under a fresh bead of caulk, which fails again in a season or two. The methodical approach used in a step-by-step flashing diagnosis isolates the exact failed piece instead of resealing the whole dormer and hoping.
Which Repair Fixes the Leak You Found?
Once you know which joint is failing, the repair method should match it. Here's what each common fix actually addresses, and where the line sits between a reasonable DIY project and a job that needs a licensed roofer.

Step flashing replacement. This involves lifting the shingle courses along the cheek wall, removing the old flashing pieces, and installing new step flashing behind the siding and under each shingle course. It's moderately invasive because siding often needs to come loose temporarily. DIY is reasonable only if you're comfortable removing and replacing siding trim; most homeowners hire a pro for this one.
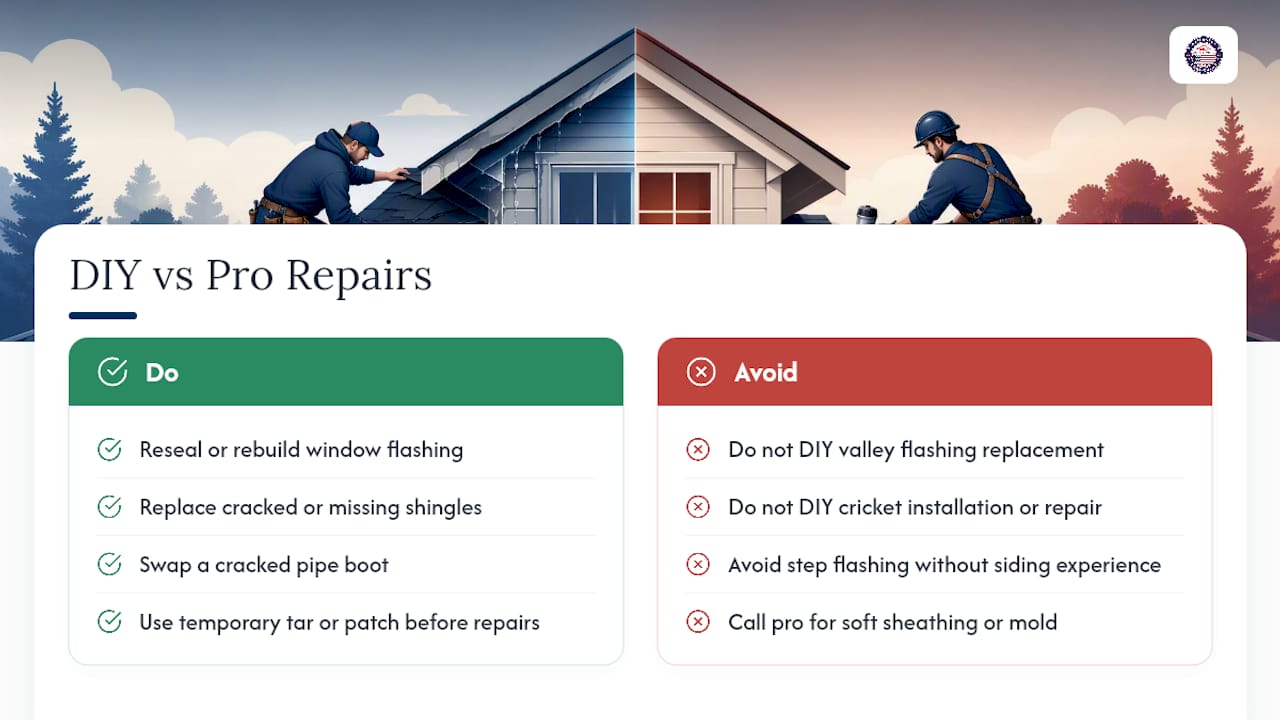
Apron/headwall flashing repair. Similar process at the front of the dormer, but usually a shorter run of flashing than step flashing. A single piece replacement is sometimes DIY-feasible for a handy homeowner with roofing experience.
Valley flashing replacement. This is more invasive since it usually requires pulling shingles from both adjoining roof planes. Given the volume of water valleys handle, a botched valley repair fails fast, so this is generally a pro job.
Cricket installation or repair. Building or repairing the small triangular diverter behind a dormer requires framing knowledge and correct flashing integration. This is a pro job in nearly every case.
Resealing or replacing window flashing. Fresh caulk or flashing tape around the window frame is one of the easier DIY tasks, but caulk-only fixes are typically temporary. A lasting repair rebuilds the flashing layers and ice-and-water membrane underneath, not just the visible sealant bead.
Shingle or tile replacement. Swapping cracked or missing shingles on the dormer's small roof plane is one of the more approachable DIY repairs, provided the underlying deck is sound.
Pipe boot replacement. A cracked rubber boot around a vent pipe is a quick swap and one of the most affordable fixes on this list.
Emergency tar or patch. This buys time before a storm or before a scheduled repair. It is never a permanent fix and often traps moisture underneath, making the eventual proper repair more expensive.
Most standalone dormer leak repairs fall between roughly $200 and $2,000, depending on which junction failed and whether sheathing or framing underneath needs attention. That range assumes the deck below the flashing is still sound.
Call a professional immediately, rather than attempting any of the above yourself, if you find soft or spongy sheathing, visible mold or a musty smell in the attic, a leak that returns within a season of a previous repair, or damage tied to ice-dam backup during a cold snap. Each of those signs points to hidden rot or a repair that's more complicated than the surface suggests, and misdiagnosing that scope wastes time and money.
What Do Dormer Repairs Cost and How Long Do They Take?
Cost and time scale almost entirely with how much of the structure underneath the flashing has been compromised, not with the size of the visible leak. A pinhole leak that's been dripping quietly for two years can cost more to fix than an obvious, recent one, simply because it's had time to rot sheathing.
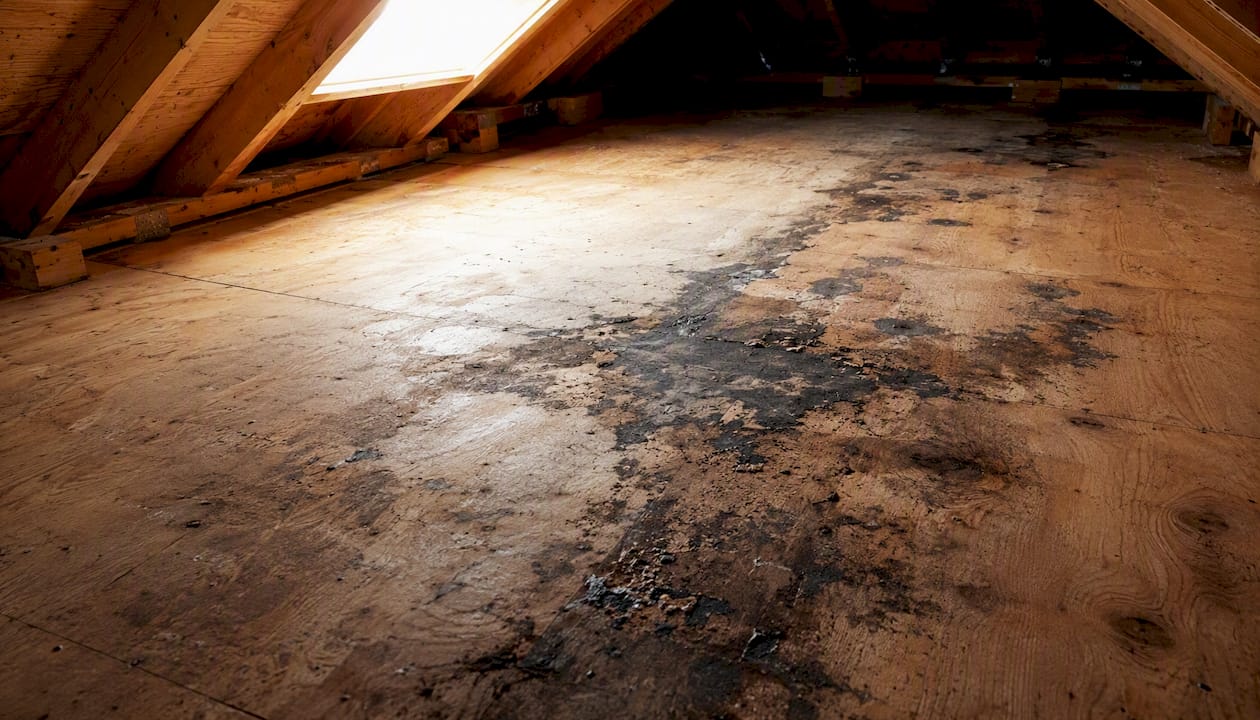
Hidden rot, mold, or sheathing failure discovered mid-repair is the single biggest reason a straightforward flashing fix turns into a multi-day project. A roofer who opens up a step flashing run and finds soft plywood underneath has to stop, replace the deck, and then reflash, which adds both labor hours and material cost.
If you're planning to file a homeowner's insurance claim for storm or wind-related dormer damage, documentation matters as much as the repair itself. Photograph the stain, the attic wet point, and any exterior flashing damage before any repair work begins, and keep the original photos separate from post-repair photos. A checklist for preparing roof damage evidence helps you gather what adjusters actually look for, and a written roof inspection report from a licensed contractor carries far more weight with a carrier than a homeowner's own description of the damage. If you've put up an emergency tarp or temporary patch to stop active dripping, photograph that too, since insurers often ask about mitigation steps taken before the permanent repair.
Should You Repair the Dormer or Rebuild It?
Isolated flashing failures almost always call for a targeted repair. A full dormer rebuild or roof replacement becomes the responsible choice once damage has spread beyond a single junction or the framing itself is compromised.
Run through this checklist before deciding which direction makes sense:
- Age of the roof. A dormer leak on a roof already near the end of its expected lifespan is a different conversation than the same leak on a roof five years old.
- Number of failing junctions. One bad flashing seam is a repair. Three or four failing points around the same dormer often signal the original installation was flawed, and patching each one individually rarely holds.
- Extent of flashing failure. Surface rust on flashing is a repair. Flashing that's separated, corroded through, or missing entirely across multiple runs points toward a full reflash rather than a patch.
- Presence of rot or mold. Any soft sheathing, visibly rotted framing, or mold growth changes the scope immediately and usually adds cost beyond simple flashing work.
- Cost threshold. When an isolated repair estimate starts approaching several thousand dollars because of structural damage, it's worth comparing that number against a broader roof replacement estimate.
- Visible structural damage. Daylight visible at dormer seams, sagging rooflines, or water actively dripping during a rainstorm are not "monitor and see" situations.
Watch for these red flags specifically, since they call for an urgent professional inspection rather than a wait-and-see approach: soft or bouncy sheathing underfoot in the attic, visible black mold on framing or insulation, daylight showing through dormer seams from inside the attic, or a leak that reappears after a repair was already completed.
Pro Tip: A useful rule of thumb: if a repair estimate for a single dormer starts creeping past a few thousand dollars because of hidden rot, ask for a side-by-side comparison against a full roof replacement quote. At The Original Roof Repair Company, replacement only gets recommended when a repair estimate exceeds $4,000 or when structural damage genuinely requires it, not as a default upsell. A red flags checklist can help you sanity-check a contractor's recommendation either way.
A Seasonal Checklist to Keep Dormer Leaks From Starting
Prevention costs far less than repair, and dormer flashing responds well to a simple twice-yearly rhythm rather than constant attention. Georgia's climate, with wet springs, humid summers, and occasional ice events in the Atlanta metro area, rewards homeowners who inspect on a schedule instead of only after a storm.
- Spring: Clear gutters and downspouts of winter debris, and inspect all dormer flashing for damage after freeze-thaw cycles.
- Summer: Check for wind-driven damage after thunderstorms, and clear leaves or pine needles that collect in dormer valleys and crickets.
- Fall: Clean gutters again before leaf drop settles in, and trim back tree branches that overhang the roof or dormer.
- Winter: Watch for ice dams forming at dormer eaves, and check attic ventilation and insulation levels, since poor ventilation contributes to ice dam formation in colder snaps.
Beyond the seasonal sweep, a few routine tasks pay off disproportionately. Reseal window frames on a proactive schedule rather than waiting for a visible gap. Check that kick-out flashing exists at the base of every dormer sidewall, since it's frequently missing on builder-grade installs and its absence quietly funnels water into the wall cavity for years before anyone notices the rot. Clear debris from valleys and crickets after every significant storm. Replace cracked shingles or tiles as soon as you spot them rather than letting a small gap become an entry point.
Pro Tip: Twice-yearly inspections, once in spring and once in fall, catch the majority of developing problems before they become interior leaks. In high wind and rain climates like greater Atlanta, that habit alone prevents most of the emergency calls we get. A homeowner-facing roof inspection checklist is worth keeping on hand so you know exactly what to look for each time.
How a Repair-First Roofer Diagnoses a Dormer Leak
Professional diagnosis follows the same logic a careful homeowner uses, just with more tools and more experience reading the signs correctly. Here's the sequence a licensed inspector should run through.
- Interior attic assessment to locate the stain, check insulation for dampness, and note nail tip discoloration.
- Tracing to the highest wet point, since that's the point closest to the actual leak rather than the visible stain.
- Top-side inspection of step flashing, apron flashing, the valley, and any cricket behind the dormer, checking for separated seams, rust, and missing pieces.
- A controlled water test, run section by section, to confirm the exact joint responsible before any repair estimate is written.
- Probing for soft wood around the suspected entry point to check whether sheathing or framing has already been compromised.
- Written estimate and photo documentation, so the homeowner sees exactly what was found and what the repair addresses.
A good inspection ends with the roofer showing you the wet point in your attic and the failed flashing on your roof, not just handing you an invoice. If a contractor can't point to the specific joint that failed, they haven't actually finished diagnosing the problem.
The Original Roof Repair Company follows a repair-first policy: replacement gets recommended only when a repair estimate exceeds $4,000 or when structural damage makes replacement the smarter economic choice, not as a default upsell path. For homeowners across Canton, Cherokee County, and the broader Atlanta metro dealing with active dripping or storm damage, emergency response is available to stop water intrusion before it spreads further into the attic or walls.
Documentation matters for more than peace of mind. Inspectors photograph the stain, the highest wet point in the attic, the failed flashing itself, and any related shingle or sheathing damage, then use that documentation to support insurance claim advocacy, working directly with carriers and adjusters on the homeowner's behalf rather than leaving that negotiation entirely to the homeowner.
Why the "Just Reseal It" Advice Keeps Failing Homeowners
The most common mistake I see homeowners make with a dormer leak isn't ignoring it. It's treating caulk as a repair instead of a stopgap. A fresh bead of sealant around a window frame or flashing seam looks like it solved the problem, and it might even hold for a season or two. But caulk isn't flashing. It doesn't shed water the way properly layered metal does, and it degrades faster than most people expect under Georgia's UV exposure and summer heat cycling.
What actually holds up over the long run is boring: individual step flashing pieces cut correctly for each shingle course, a headwall flashing that's mechanically fastened and properly lapped, and kick-out flashing where a sidewall meets a roof edge. None of that is exciting to talk about, but it's the difference between a repair that lasts fifteen years and one that leaks again by next spring.
If you take one thing from this guide, ask your roofer to physically show you the leak source and the highest wet point in the attic during the inspection, before any repair estimate gets written. If they can't point to it, they're guessing, and you're paying for a guess.
Get a Dormer Leak Diagnosed the Right Way
A dormer leak that's spreading water into your ceiling or walls doesn't get better on its own, and the longer it sits, the more likely it is to turn a $500 flashing fix into a $2,000 sheathing repair. The Original Roof Repair Company runs the same diagnostic sequence covered in this guide on every dormer leak call, tracing the leak to its actual source before writing an estimate, not guessing from the ground.

We serve Canton, Cherokee County, and the surrounding counties within the Atlanta metro area, and we hold to a repair-first pricing threshold: replacement only gets recommended when a repair estimate exceeds $4,000 or structural damage requires it. As a BBB accredited business, we also handle insurance claim advocacy directly with carriers and adjusters when storm or wind damage is involved, and every inspection is free.
If you're seeing active dripping, a fresh ceiling stain, or storm damage near a dormer, don't wait for the next heavy rain to find out how bad it's gotten. Request an emergency roof repair if water is actively coming in, or schedule a free roof repair inspection to get the leak traced and documented before it spreads.
Sources
- Roof Leak Around Dormer Window: Causes, Signs and Fixes (UK Guide) - Property Defect Guide
- Dormer Roof Leak Detection Guide (Flashing, Valleys) 2026
FAQ
Are dormers prone to leaks?
Yes. The multiple roof junctions a dormer creates, step flashing, valleys, headwall flashing, and window seals, give water more entry points than a plain roof slope has, which makes dormers one of the more leak-prone features on a home.
What is the typical lifespan of a dormer roof?
A dormer's roofing materials generally last as long as the main roof around it, but its flashing tends to fail sooner because it handles more concentrated water flow and more joints; many flashing components need attention well before the shingles themselves do.
What are the common problems with dormer roofs?
The most frequent issues are step flashing failure, deteriorated caulk and window seals, missing or damaged crickets, and valley flashing failure, all of which create entry points for water at the seams where the dormer meets the main roof.
How much does it usually cost to fix a roof leak around a dormer?
Most isolated dormer leak repairs cost between $200 and $2,000, depending on which flashing junction failed; costs climb higher when hidden rot or sheathing damage is discovered during the repair.
When should I call a professional instead of trying a DIY fix?
Call a professional immediately if you see soft or spongy sheathing, mold, daylight at a dormer seam, or a leak that returns after a previous repair, since these signs usually mean the damage extends beyond what a surface fix can address.