
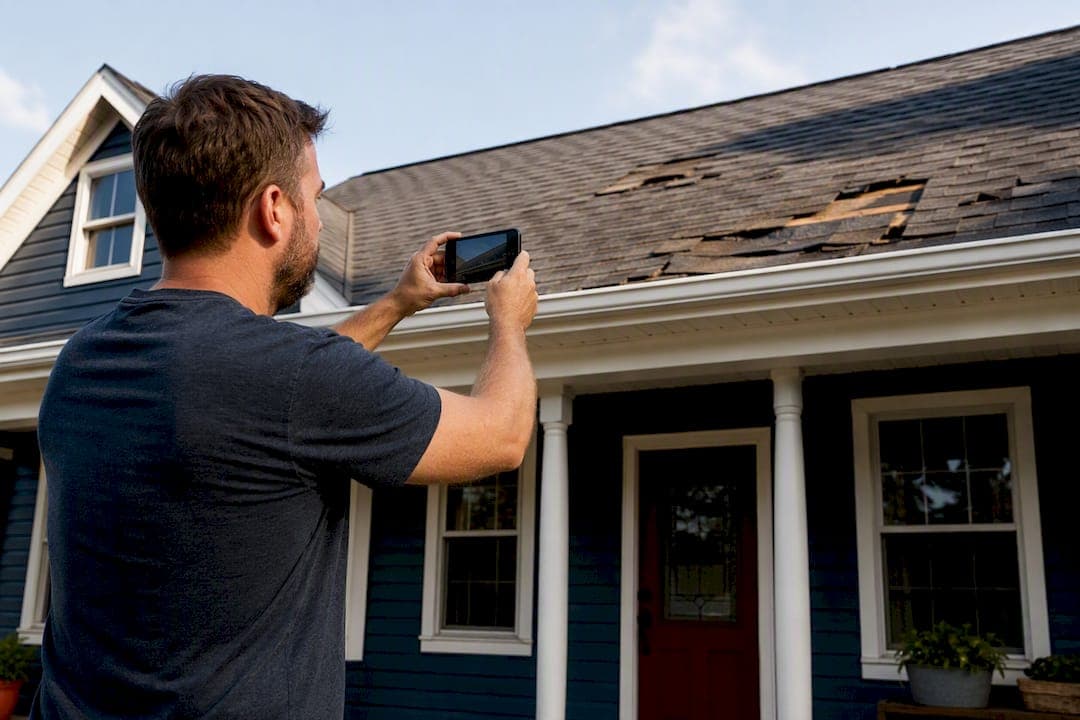
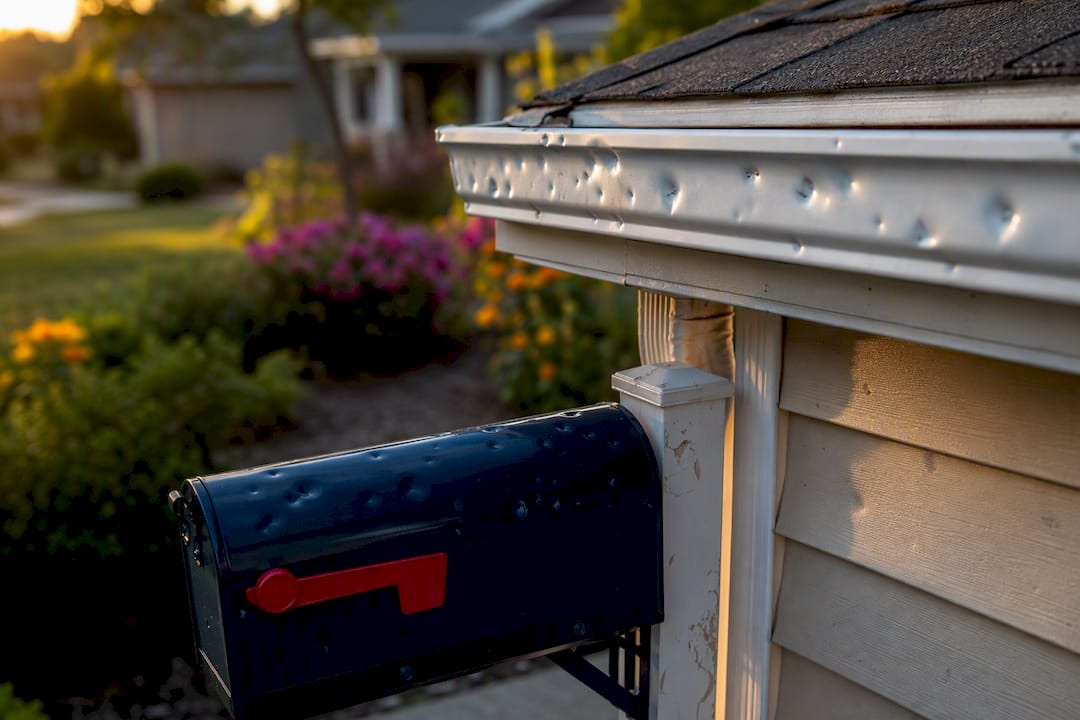
Capture wide shots of every roof slope, mid-range shots showing damage in context, and close-ups of each damaged spot with a coin or ruler for scale. Add interior and attic photos that show water paths, plus collateral evidence like dented gutters, AC fins, or a mailbox to confirm storm intensity. Keep your phone's location and timestamp settings on, and never edit or compress the original files before you send them.
Photograph everything before cleanup whenever it's safe to do so. If you need to tarp a hole to stop further damage, photograph the tarp and its edges first, then document the surrounding area once it's covered.
- Wide shots: every slope, from the ground, with the house fully visible
- Mid-range shots: damage in context next to a roof feature (valley, chimney, vent)
- Close-ups: each damaged spot with a scale object, 2 to 3 angles
- Interior/attic: ceiling stains, wet insulation, daylight through the decking
- Collateral evidence: gutters, AC fins, mailbox, window screens
Pro Tip: Once you've taken your still photos, walk the property again and record a 60 to 90 second narrated video. Say which slope you're on and point out each problem area out loud. It ties your entire photo set together and gives the claims reviewer a continuous record instead of a stack of disconnected images.
Key Takeaways
Filing a strong roof damage claim depends on wide, mid-range, and close-up photos with scale references, interior corroboration, and preserved timestamp metadata submitted in an organized file structure.
| Point | Details |
|---|---|
| Shoot in layers | Capture wide, mid-range, and close-up photos with a scale object for every damaged area. |
| Preserve metadata | Keep EXIF timestamp and location data intact; never edit or compress originals before submitting. |
| Document collateral evidence | Photograph gutters, AC fins, and mailboxes to help confirm hail size and storm intensity. |
| Organize before submitting | Use a consistent folder structure and file-naming template so adjusters can review quickly. |
| Get professional documentation | The Original Roof Repair Company provides free inspections, drone imagery, and claim packets for Atlanta-area homeowners. |
Table of Contents
- What Photos Do Insurers Actually Want to See?
- How Do You Photograph a Roof Safely?
- How Should You Organize and Submit Your Photo Evidence?
- When Should You Call a Roofer for a Professional Inspection?
- Your Pre-Claim Photo Checklist
- What Should You Know About Sharing Roof Photos With Third Parties?
- What We See on Roof Inspections Across Atlanta
- How The Original Roof Repair Company Can Document Your Claim
- Sources
- FAQ
What Photos Do Insurers Actually Want to See?
Insurance adjusters aren't just checking that your roof is damaged. They're checking why it's damaged, and photos are how you make that case. Adjusters are trained to confirm whether damage came from a sudden, accidental event like a hailstorm or straight-line wind, rather than years of wear and tear that a policy typically excludes. A disorganized handful of blurry photos leaves that judgment call up to guesswork. A structured set doesn't.
Start with wide, establishing shots. Stand at each corner of the yard and photograph the full roofline of every slope, ridge to eave, with enough of the house and driveway visible that the adjuster can orient themselves without ever having stood on your property. These shots don't need to show damage in detail. Their job is context.
Mid-range shots come next. Move closer and frame the damaged section next to a roof feature, a valley, a chimney, a plumbing vent, so the reviewer understands where on the roof the damage sits, not just that damage exists somewhere. This is also where directional patterns matter: wind uplift tends to lift shingles in one consistent direction, while hail leaves random pockmarks scattered across a slope. Photographed clearly, that patterning becomes evidence in its own right.
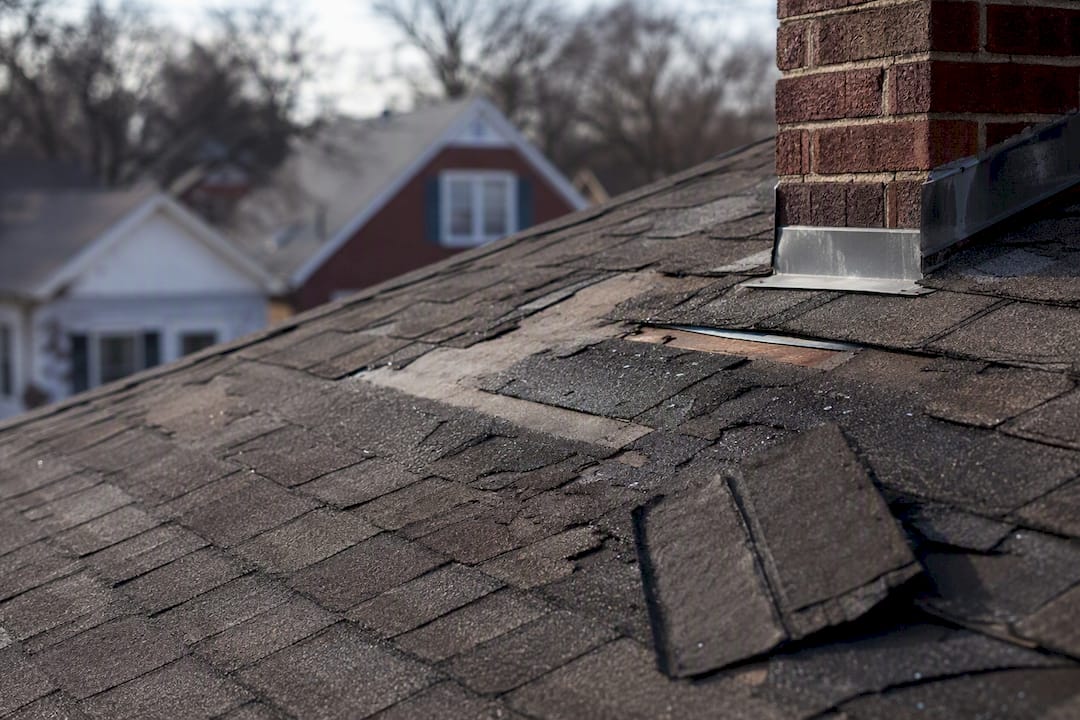
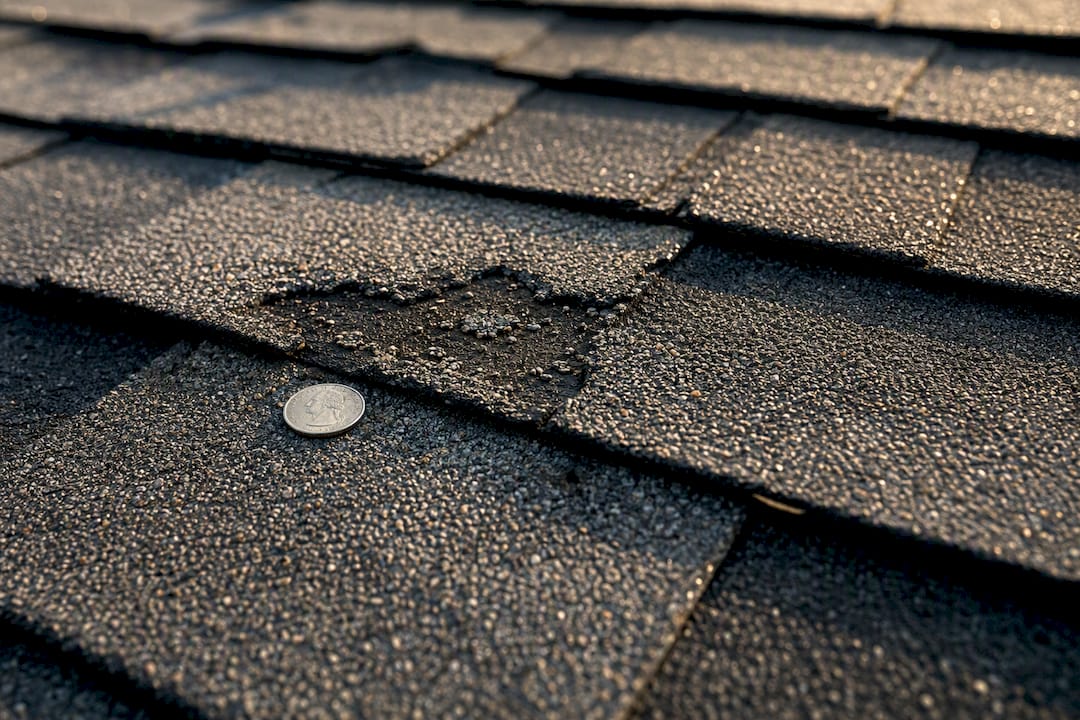
Close-ups do the heavy lifting for the actual claim value. Get tight on missing shingles, lifted or fractured tabs, exposed underlayment, bruised granules, and any punctures. Lay a coin or a tape measure next to the damage in every close-up. Without scale, a hail bruise the size of a quarter looks identical in a photo to one the size of a golf ball, and that difference can change your settlement. Take two or three frames of each spot from slightly different angles, since low sun or a shadow can hide a crack in one shot and reveal it in the next.
Interior and attic photos back up everything you just shot outside. A ceiling stain, sagging drywall, wet insulation, or a shaft of daylight coming through the decking all corroborate that the exterior damage you photographed is actually letting water in. Adjusters lean on this pairing because interior evidence supports the causation story that exterior photos alone can't tell.
Don't skip the soft-metal evidence. Dented gutters, bent AC fins, a pockmarked mailbox, or torn window screens all confirm hail size and storm intensity in ways a roof photo can't always capture on its own, since these softer materials bruise more visibly than shingles and give adjusters a second, independent way to size up the storm.
Before you shoot a single frame, check that your phone's location and time metadata (EXIF data) is turned on in your camera settings. Skip filters, skip heavy editing, and back up your originals to the cloud right away. Field practice among roofing professionals points to a 12-shot checklist per slope and a full packet of roughly 40 to 75 photos for a typical hail or wind claim, sometimes with a short narrated video standing in for dozens of redundant frames.
Pro Tip: Name each slope out loud in your video, "this is the south slope facing the street," before you describe what's wrong with it. Adjusters reviewing files later won't know your house. That one habit orients them instantly.
How Do You Photograph a Roof Safely?
The best photo you'll ever take is the one that didn't require you to climb onto a damaged, wet roof. Falls off roofs send tens of thousands of people to emergency rooms every year, and a storm-soaked deck with missing shingles is exactly the surface where that happens. Shoot from the ground with an optical zoom whenever you can, and treat attic access as the only "inside" vantage point you need.
- Smartphone with optical zoom, or a basic DSLR/mirrorless if you own one
- Tape measure or ruler, plus a coin for quick scale shots
- Sturdy ladder with a spotter, only for ground-level or gutter-height shots
- A licensed contractor or drone operator for anything requiring roof access
Keep your camera at full resolution and turn off aggressive compression settings. Leave the flash off for daylight exterior shots, since it flattens texture and hides the granule loss adjusters look for. Use HDR sparingly. It brightens shadows but can wash out the subtle bruising that makes a hail hit visible. If you're flying a drone yourself, follow your local airspace rules and keep a safe distance from power lines and neighboring properties; otherwise, most local roofers already carry drone baselines and can shoot it for you.
Pro Tip: Narrate as you go, even on the ground. "Front left slope, three missing shingles near the ridge" spoken into your video is worth more to an adjuster than a silent close-up with no context.
How Should You Organize and Submit Your Photo Evidence?
A great set of photos can still get overlooked if the file names are a jumble of "IMG_4471.jpg" and the folder looks like a phone's camera roll dumped straight into an email. Adjusters and claims reviewers move fast through submitted files, and clear organization is what gets your evidence actually looked at instead of skimmed past.
Build one root folder named with your address, policy number, and the storm date, something like 123MainSt_Policy4487_20260607. Inside, create subfolders for Photos, Video, Attic, Interior, Docs, and Weather. Within Photos, name each file with a simple, consistent pattern: date, slope, component, and shot number, for example 20260607_SouthSlope_RidgeCap_C01.jpg. It looks tedious for five minutes and saves everyone hours later.
| Folder | What goes inside |
|---|---|
| Photos | Wide, mid-range, and close-up shots organized by slope |
| Video | Narrated walkthrough covering every slope |
| Attic | Interior shots showing leak paths and wet insulation |
| Docs | Contractor report, receipts, maintenance records |
| Weather | NOAA/NWS storm event screenshots or PDFs |
Order your submission the same way you shot it: establishing photos first, then slope-by-slope mid-range and close-up shots, then collateral and interior evidence, then your video and supporting documents last. This mirrors how printable checklists and strict file naming reduce oversight during claims review, and it makes your packet feel complete rather than scattered.
Round out the packet with a contractor inspection report, any previous maintenance or inspection photos that show your roof's condition before the storm, receipts for emergency tarping or repairs, and a screenshot of the NOAA/NWS storm record for your area and date. A short written timeline (when the storm hit, when you noticed damage, when you called your insurer) ties the whole file together.
When you submit, upload full-resolution originals to a shared cloud folder like Google Drive or Dropbox, or directly through your insurer's portal, rather than texting compressed images that strip out metadata. A single shared link with an attached photo log matching file names to plain-language descriptions is far easier for a reviewer than fifty separate email attachments. If you need help structuring that file log, a Georgia-specific claim steps guide walks through the submission order in more detail.
Pro Tip: Photograph first, mitigate second, and call your insurer as soon as it's safe. Scheduling a professional inspection within 48 to 72 hours of the storm keeps your evidence fresh and your timeline airtight.
When Should You Call a Roofer for a Professional Inspection?
Call a local roofer immediately if you see structural sagging, an active interior leak, or damage on a slope you can't safely photograph from the ground. A professional inspection isn't just about safety. Contractor-led documentation tends to mirror exactly what an adjuster is trained to look for, which is why pairing a roofer's report with the adjuster's own review speeds up alignment between what the contractor scopes and what the insurer approves.
A solid contractor claim packet should include drone or aerial images of every slope, ladder-level close-ups of specific damage, a written scope using directional language ("north slope, wind-driven uplift along the ridge"), measurements, materials noted, a dated signature, and clear language distinguishing repairs from code-required upgrades.
- Drone or aerial photos covering the full roof
- Ladder-level close-ups tied to the written scope
- Measurements and materials list
- Dated, signed inspection notes
- A distinction between "repair" items and "code upgrade" items
Ask your contractor specifically for a "claim packet." That means an indexed photo folder, aerial imagery, inspection notes, and a single PDF the adjuster can attach directly to your claim file rather than piecing together loose attachments. A written scope from a licensed roofer carries weight precisely because it uses the same structured, documented approach adjusters compile themselves, which cuts down on the back-and-forth that drags claims out for weeks. If your damage involves flashing or chimney transitions specifically, a specialist in chimney and masonry repair can add detail an adjuster may not catch on a general roof walk.
Pro Tip: Ask your contractor to be on-site when the adjuster inspects, or on-call during a virtual review. When the roofer's observations frame the damage first, the adjuster's scope tends to land much closer to what repairs will actually cost.
Your Pre-Claim Photo Checklist
Work through this order every time, and you won't miss the shots that matter most.
- Establishing shots of every slope from the ground
- Slope-by-slope mid-range and close-up shots with scale
- Collateral soft-metal photos (gutters, AC fins, mailbox, screens)
- Interior and attic photos showing leak paths
- A narrated video walkthrough naming each slope
- Weather records, receipts, and prior inspection documents
- Plan for 6 to 12 photos per slope
- Expect 40 to 75 total images for a complete hail or wind claim packet
- If you tarped before shooting, photograph the tarp, its edges, and ground debris first
What Should You Know About Sharing Roof Photos With Third Parties?
Your roof photos are your property, and you control who sees them. That said, once you submit images to an insurer, they become part of your claim file and the insurer's internal record, which is standard practice and not something to worry about. The consideration that actually matters is what you capture incidentally in the frame.
Wide shots taken from your yard will often include a neighbor's house, a parked car with a visible license plate, or people in the background. It's good practice to avoid zooming in on details that aren't relevant to your claim, like a neighbor's windows or backyard, and to crop or reframe if someone else's property becomes the focal point rather than a background element.
If you're sharing photos with more than one party, your insurer and a contractor, for example, it's worth keeping a simple record of who received which files and when. That's not a legal requirement so much as good housekeeping if a dispute ever arises over what was submitted and to whom.
Finally, be mindful that photos showing personal belongings inside your home (through a damaged ceiling, for instance) are fine to share with your insurer as part of a legitimate claim, but there's no reason to circulate them beyond the adjuster and your contractor. Keep the sharing list short and purposeful.
What We See on Roof Inspections Across Atlanta
The most common mistake we see across Cherokee County and the greater Atlanta metro is homeowners photographing only the front of the house, then wondering why their claim gets questioned. Storms don't damage roofs evenly, and a north slope that took the worst of the wind often goes completely undocumented. Compressed screenshots and skipped metadata are the next biggest issues; once a file loses its timestamp, you've lost your strongest proof of timing.
Atlanta and Georgia adjusters tend to weigh pre-storm inspection records heavily, and they'll often cross-reference your claim against NOAA and NWS reports to confirm the storm window actually matches your documented damage date. The fix is straightforward: follow the slope-by-slope sequence every time, label your files without embellishment, and attach a short storm timeline. It's a small habit that consistently produces cleaner, faster claims.
How The Original Roof Repair Company Can Document Your Claim
Gathering forty-plus organized, properly labeled photos while your roof is actively leaking is a lot to ask of any homeowner, and that's exactly the gap The Original Roof Repair Company was built to close for Canton, Cherokee County, and the broader Atlanta metro area. Instead of you climbing a ladder with a phone and hoping the angles hold up, our crews show up with drone imagery, ladder-level close-ups, and a written scope already formatted the way adjusters expect to see it.

Our free inspection includes an indexed photo folder, aerial coverage of every slope, and a documented scope distinguishing straightforward repairs from anything requiring a full roof replacement. If your damage needs immediate mitigation, our emergency roof repair team can tarp the affected area the same day, and we'll photograph it properly before we ever touch a shingle. From there, our claim advocacy service can work directly with your carrier and adjuster, presenting your documentation the way this guide describes so nothing gets lost in translation.
If a storm has hit your roof, bring whatever photos or files you already have to your inspection and we'll build the rest of the packet around them. Request a free roof inspection and an Atlanta-area crew will typically get back to you within a business day to schedule a visit.
Sources
Pull your county's NOAA or NWS storm event report and any local weather station data covering the storm date, and save it as a PDF or screenshot. Add your contractor's inspection report, repair receipts, and any older inspection photos that show your roof's condition before the storm. These records, together with FEMA-aligned guidance on photographing before cleanup, give your adjuster the verified timeline they need to accept causation.
This article is general information, not a substitute for advice from a qualified financial advisor. Consult a qualified financial professional about your own circumstances before acting on anything here.
- Documenting Roof Damage for an Insurance Claim | Roof Policy
- Roof Storm Damage Photos for Insurance | Econo Roofing
- Roofing insurance claims
- Does homeowners insurance cover roof leaks?
- Does homeowners insurance cover roof leaks?
FAQ
What documentation do I need for a roof damage claim?
You need wide, mid-range, and close-up photos of every slope, interior and attic shots showing leak paths, collateral damage photos (gutters, AC fins), a contractor inspection report, repair receipts, and a NOAA or NWS storm record for the date of loss.
What shouldn't I say to a roof insurance adjuster?
Avoid guessing at causes, ages, or costs you're not certain of, and don't speculate that damage is "probably from wear and tear." Stick to what your photos and contractor report actually show, and let a professional like The Original Roof Repair Company help frame the scope if you're unsure.
How do I prove hail damage on a roof?
Photograph bruised granules, punctures, and cracked tabs with a coin or ruler for scale, then photograph collateral soft-metal damage on gutters, AC fins, and mailboxes, since these indicators help verify hail size and impact density.
What does roof damage look like in photos?
Wind damage typically shows directional patterns, like shingles lifted consistently in one direction, while hail damage appears as random, scattered bruising or punctures across a slope rather than a uniform pattern.
How many photos should I take for an insurance claim?
Plan for 6 to 12 photos per slope, with a complete packet typically landing between 40 and 75 total images for a comprehensive hail or wind claim.